How to Paint Your Full Face Helmet
Updated 4/21/20
Skateboarding is roughly 80% about looking cool, and a custom painted helmet looks at least 73% cooler than a stock color; so in the interest of helping everyone stand out on the hill, here’s a guide on how to paint your helmet.
Some notes before we go into this: a good paint job is all about being patient, following the directions on the can, and thorough prep work and finishing. You’re going to spend a few minutes painting and a lot of time sanding, waiting for things to dry, and polishing. The more patient and thorough you are, the better your helmet is gonna come out. Expect your helmet to be out of commission for at least a week.
WHAT YOU’LL NEED (these are Amazon affiliate links)
Waterproof sandpaper in 220, 400, 800, 1000, 1500, 2000, and 2500 grit. (Grits over 400 are optional)
A bowl or bucket of warm, soapy water.
Primer, paint, and clear coat. You have two basic options here, which can be described as hardware store or auto supply store.
Hardware store paint is cheaper and easier to work with. Grab some gray primer and pick a paint color you vibe with. Don’t worry about the finish of your paint, because you’re going to be using a glossy clear coat to finish. I linked Rust-Oleum products here because you should be able to find them in any hardware store and I have had good results with them in the past. If you want a wider color selection, Montana makes artist-grade acrylic spray paints in hundreds of shades.
Car and motorcycle paint is a little more expensive, a little more delicate to work with, but tends to deliver better results. You’re going to use a plain gray primer and pick a paint color you like. For clear, Zak Maytum recommended 2K clear glamour spray, a two-part automotive clear that comes in a rattle can, and it is BY FAR the best clear I have ever used.
Somewhere to paint that is well-ventilated and within the temperature and humidity guidelines set out on your paint cans. Please be aware that 2K overspray will stick to whatever is nearby. Don’t be an idiot and spray near your car like I did (it will come off with a clay bar).
Plenty of patience.
Rubbing and polishing compounds and car wax. (Optional)
Door edge trim. I use black; but it’s also available in chrome and fake carbon fiber.
Tack cloths or clean rags (old t-shirts or underwear works well)
Optional: a hair dryer and a cardboard box big enough to fit your helmet.
Ok, got all your supplies? Let’s go.
First, take apart your helmet. Pull off all the stickers and remove the adhesive (a hairdryer will make this easier). Remove the visor and all removable hardware. (Put the visor hardware in a plastic bag in a safe place, because it’s usually custom and hard to replace.) Pull out the cheek pads and, if possible, the cloth liner over the eps foam.
Pull off the rubbery trim around the bottom edge and the face opening. A hairdryer will help loosen up the glue and soften the vinyl. Don’t worry about messing it up because you’re going to throw it away and replace it with door edge protector. A razor will help shave all the residue off.
Use your blue painter’s tape to mask off the entire interior of the helmet. The solvents in spray paint can melt the foam that protects your brain; so do a good job here.
Using your 220 grit sandpaper and your bowl of soapy water, wet sand off the original paint and primer, ideally down to where the fiberglass is starting to show through the stock primer. Don’t go very deep into the fiberglass, as you don’t want to damage the structural soundness of your helmet or deal with itchy fiberglass dust.
Wet sand with your 400 grit sandpaper to smooth out the surface, remove sandpaper scratches, and get it ready for paint.
Clean all the dust off your helmet by running it under the faucet, then let it dry (don’t worry, water won’t hurt your foam or the structural integrity of your helmet). When it’s dry, wipe it down again with a tack cloth or a clean, damp rag. You want to make sure it’s completely free of dust. Your helmet should have a smooth, matte finish at this point. You can see a pic of how it should look down below.
Fill out the face hole of your helmet with paper to prevent overspray from hitting the inside of your helmet. Stuffing a paper grocery bag inside will usually do the trick here.
Read the instructions on your primer, paint, and clear coat cans, then check the manufacturers’ websites for their technical data sheets. You are going to actually follow these directions, which might be the hardest part of this whole process.
Lay down your primer. Follow the directions on the can about shaking the can for at least a minute, holding the can about 16” away from the surface, and applying light, even coats. I cannot stress the light, even coats thing enough.
Less is more here. You probably won’t get full coverage on your first coat. Don’t slop a ton of paint or primer on there at once or you’ll get drips, it’ll never dry, and your finished product will look bad. Painting from the bottom of your helmet up will help avoid runs and drips.
Let your primer dry completely. This can take up to several days, depending on temperature, humidity, and the thickness of your coats. Check your can to see the dry and recoat times. Your primer is dry when you cannot dent the finish with your fingernail or smell solvents gassing off.
You can use your cardboard box and hairdryer to create a low-tech convection oven for faster drying in between coats. Just take your cardboard box and cut a 3” hole in the top of it and another hole in the side to fit the business end of your hairdryer. Stick your helmet in the box, insert the hairdryer in the appropriate hole, and turn it on (ideally at lower temperature). The heat and constantly moving air will help your paint dry faster. Note that you will want to keep a close eye on this to avoid burning down your house. (The hole in the top of the box is critical to aid convection and allow your solvent fumes to escape.) Alternately, you can just set your helmet in front of a fan.
Once your primer is dry, wet sand it smooth with your 400 grit sandpaper. You’re not trying to remove a lot of material, you’re just slightly roughing it up so paint will go down smooth. When you’re done, grab a tack cloth or a couple damp rags to wipe your helmet down and make sure it’s totally dust-free. When it’s clean, smooth, and completely dry, it’s time to paint.
Spray your first couple coats of paint. Once again, shake your paint for a couple minutes to make sure it’s properly mixed and apply light, even coats from the bottom up. Follow the directions for dry and recoat times.
Let your paint dry completely.
If you haven’t gotten total coverage, lay down another two or three coats of paint. Light or very bright colors will take more coats than darker colors to get good coverage. Metallics cover best. Neon yellow is going to require a lot more coats than flat black.
Let your paint dry completely again. Seriously, this is important.
When your paint is looking good, it’s time for clear coat. This is where you’ll make or break your final product; so follow the directions on your can and again, be sure to do light even coats from the bottom up.
Let that clear dry. (If you’re using 2K clear, you can throw your helmet in your low-tech convection oven to fully cure each coat in about an hour.)
More clear. Deep, flawless clear coat is the secret to making your paint job look fly; so feel free to do several layers. Just make sure your helmet is clean between coats.
Again, let your clear dry completely. (It can take up to a couple weeks for thick coats of hardware-store clear to cure completely.) You’ll know it’s done when the clear is very hard and your helmet doesn’t smell like paint anymore.
Lightly sand your whole helmet smooth with 400 grit sandpaper to remove any orange-peel texture. You’re not trying to go super deep here, just to smooth things out so your final coat will go down nice and smooth.
Lay down a final coat of clear.
Remove all the masking tape and the face-hole covering.
The following steps are optional and should only be followed if you’ve used 2K clear. If you’re happy with how your finish looks, you can skip to reassembling your helmet. If you want a helmet that has a perfect, mirror-smooth finish, keep going. These steps will make solid colors look extra professional; but will slightly dull the shine of glitter or exposed carbon.
Wet sand with your 800 grit sandpaper. When it feels completely smooth, move on to 1000 grit, then 1500, 2000, and 2500 in sequence. You’ll know when it’s time to step your grit up.
Again, clean off all your dust.
Following the directions on the package, treat your helmet with rubbing compound, let it dry, and buff with a clean cloth.
Less is more here. The package you bought is probably enough to do two or three whole cars. You want a slight haze.
Apply your polishing compound, let it dry, and buff with a clean cloth.
Finally, apply wax, let dry, and buff with a clean cloth. Your helmet should be wildly shiny by now.
Replace the edge trims with door edge guard. A hair dryer or heat gun will help it bend into place in the visor opening.
Put your visor back on.
Take a picture and put it on social media to stunt on your friends and/or haters.
Whack your perfectly painted against the ground to get the curse off. (This is important: failure to remove the curse is likely to result in horrific slams.)
Skate.
Additional notes:
If you want to do a glitter look like my helmet, expect to use lots of clear to build it up enough to fully bury the glitter in clear. I went through one and a half cans of 2K to get the clear deep enough to smooth out the glitter and non-glitter sections.
If you’re doing exposed carbon or the glitter look, skip the final wet sanding and polishing and just do a heavy coat of 2K after your final wet-sanding.
Process Photos:
(Pics will be updated as I finish this ongoing project.)

Visor off, hardware securely stored, trim removed with a heat gun and a sharp knife. The TSG Pass Pro Carbon trim is very stubborn and does not like to come off. In retrospect, I should have worked harder to get this off completely. I ended up having to paint the remaining vinyl bits black.

Here’s what the helmet looks like with the graphics sanded off and the whole surface wet-sanded with 400 grit. Note the smooth, matte finish with no sandpaper scratches.

Before paint texture close up. I actually sanded a bit more to take out these scratches before painting.

Taped off interior to protect the foam from harmful paint solvents.

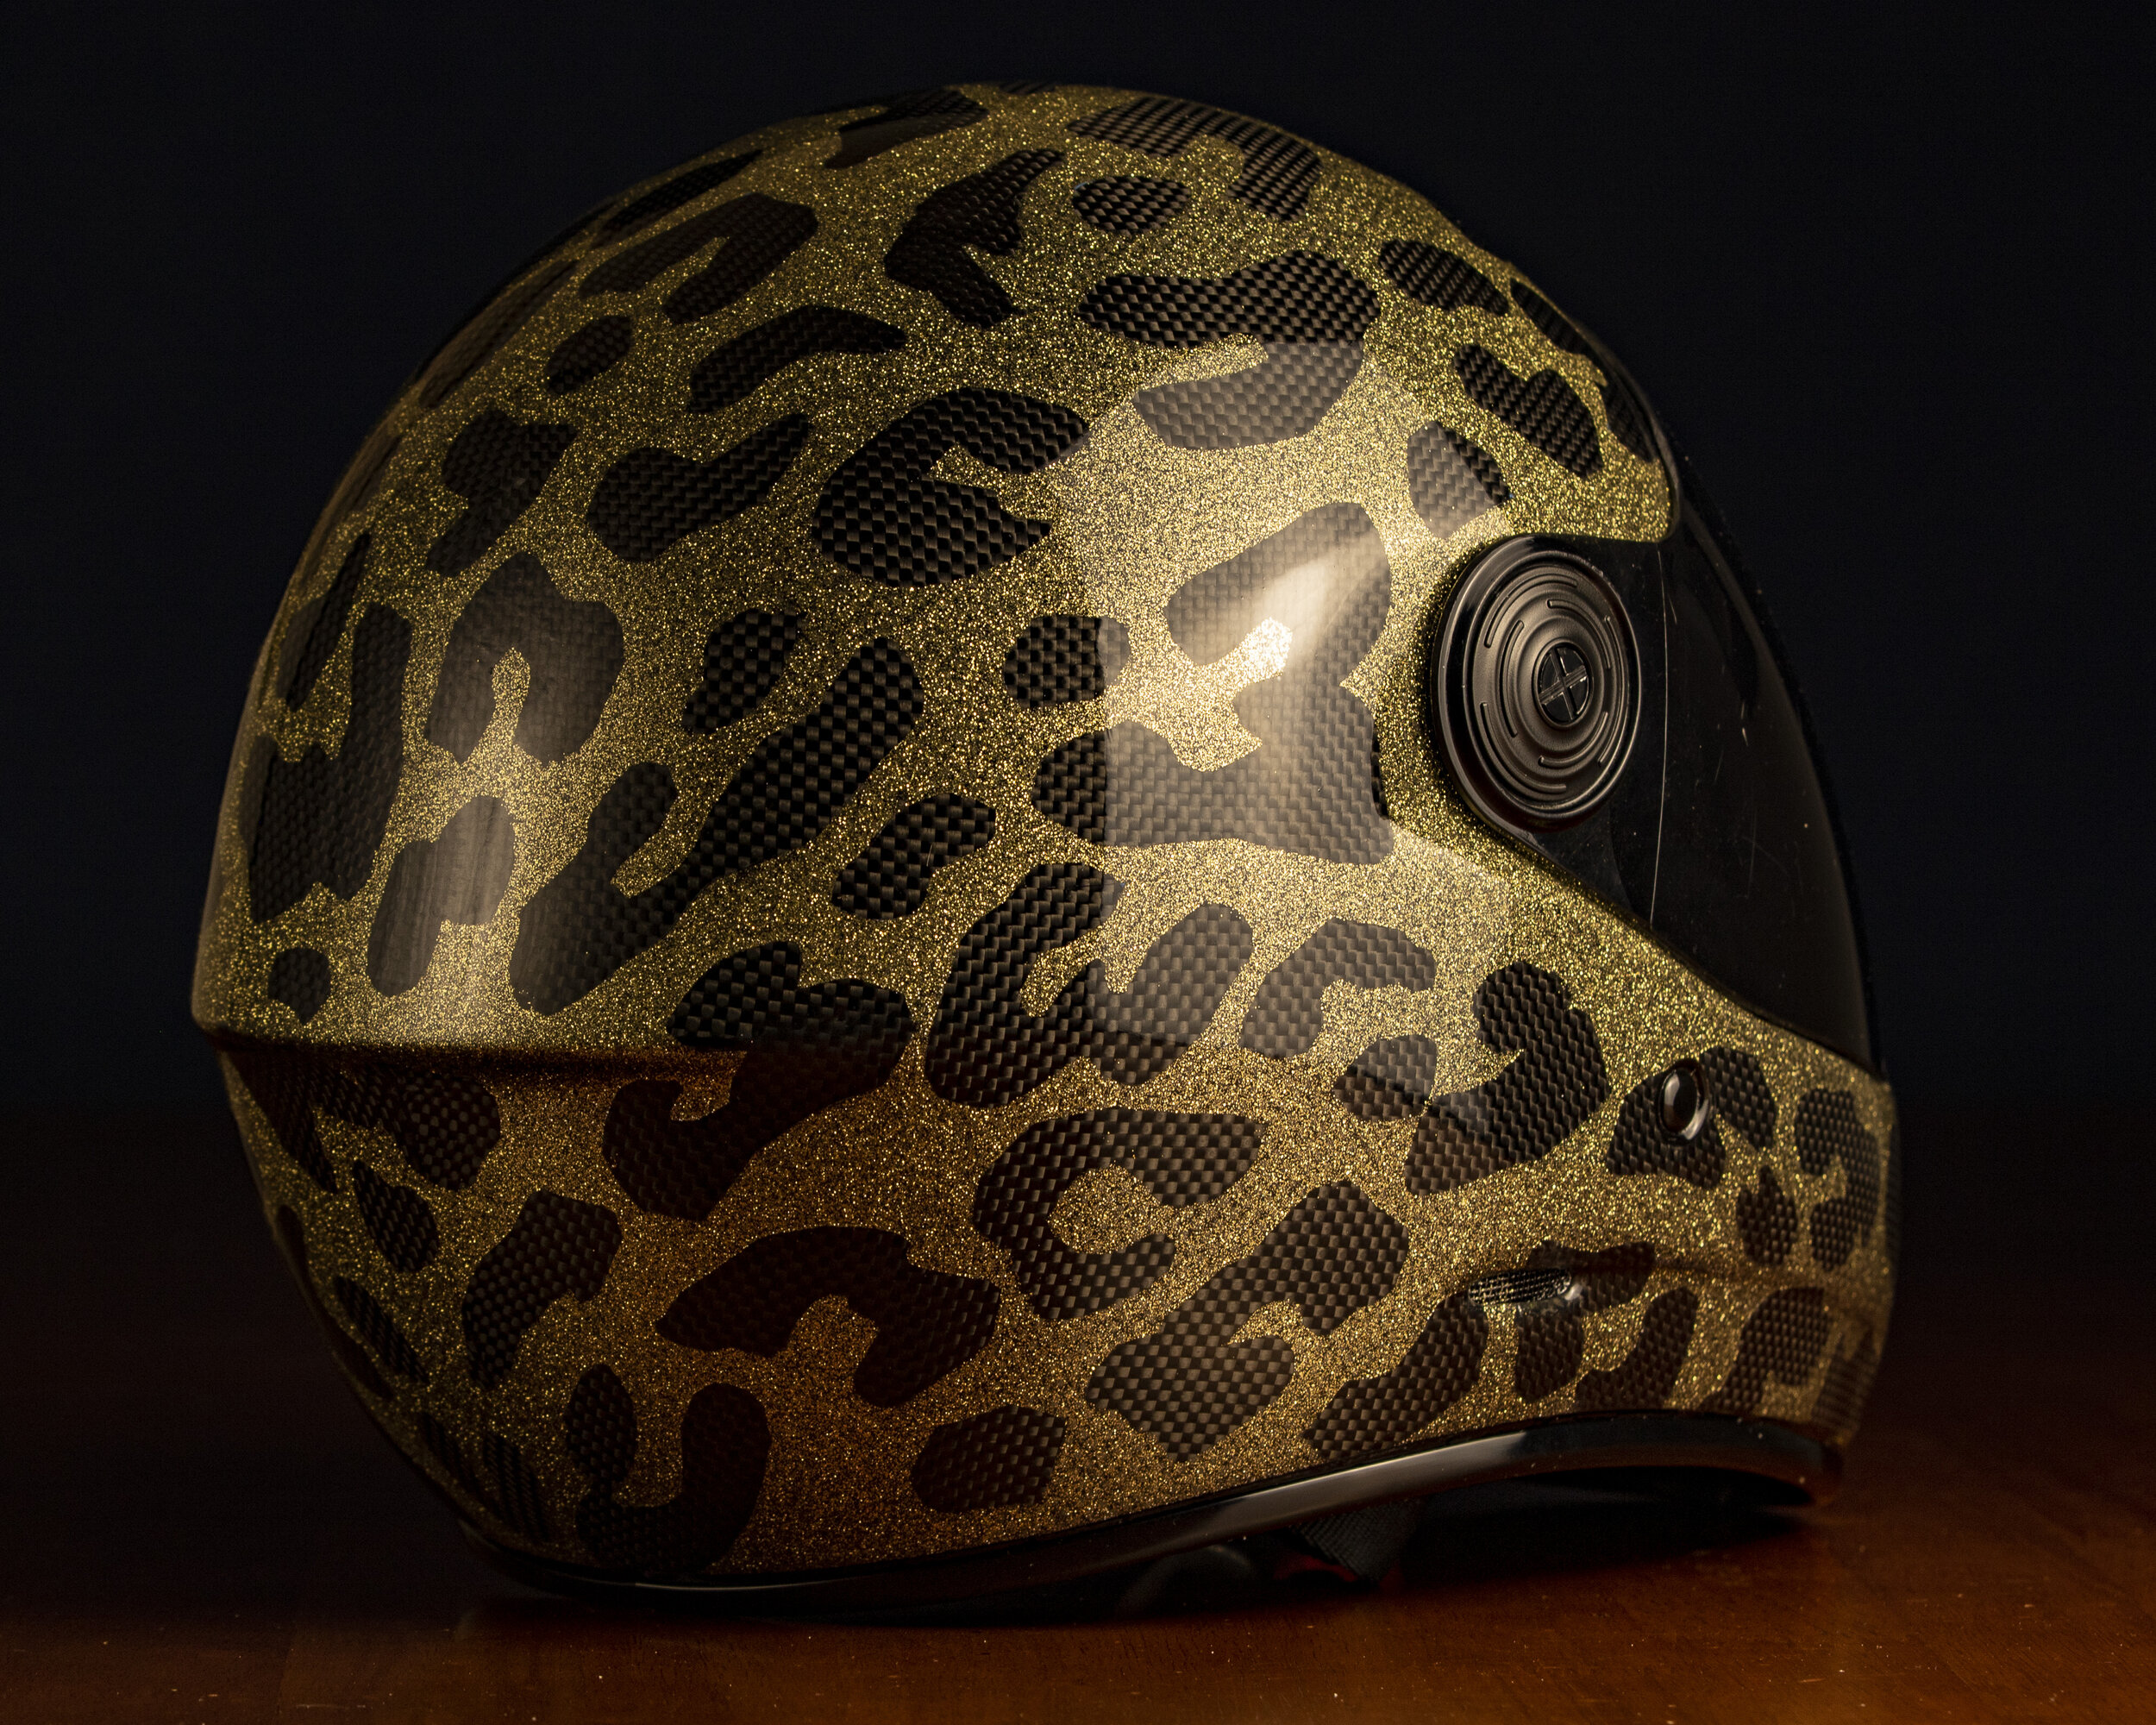
Ready for paint. Note the covered face hole and the taped-off visor hardware area. The additional tape is to create a leopard print pattern, where the leopard spots are exposed carbon fiber weave. The helmet is sitting on a light stand with a coffee can on the end of it.

After the gold glitter spray. Remember: use light, even coats for a nice finish.

Tape removed. Note the thickness of the glitter and its relative dullness here: we’re going to have to build up enough coats of clear to fully bury the glitter (for maximum sparkle) and even out the depth between the exposed carbon and the glitter.

The carbon looks great after the first coat of clear; but it’s going to take several more coats to bury the glitter and make a smooth surface (note the texture on the nose). Sorry for the slightly blurry picture.

Once enough clear has been built up, I gave it a final wet sand at 400 grit. Note how the surface height difference between the glitter and the carbon is gone.

This is the surface after wet-sanding the clear to 2500 grit. Note the ugly vinyl residue and that the perfect, mirror smooth surface has come at the cost of slightly dulling the sparkle of the glitter and the “deep” look of the carbon. Rubbing compound, polish, and wax restored the gloss; but the dullness of the glitter and carbon persisted. I had to do something about the ugly yellow trim residue anyway; so I wet- sanded the whole helmet with 400 grit again, painted over the trim residue with black primer, and sprayed final coat of clear, which restored the brilliance.

To get the perfect circle for the strap rivet, I put a piece of masking tape on a cutting board, then carefully traced around the cap of a marker with an x-acto knife.
If I had a do-over, I would have spent more time getting the trim off completely and painted it at the start of the process. I’ll do it better next time.
Finished and reassembled. The final clear has a very slight orange peel; but the glitter sparkles bright and the carbon looks great.